Step 6: Change
the extension
AAC files
typically use
the file
extension
“.m4a,” which
you might notice
when you click
on your AAC
file. For
ringtones,
however, iTunes
uses the “.m4r”
extension, which
is the same as
.m4a but with a
different name.
That being the
case, we will
need to change
the extension
from .m4a to
.m4r in order to
use this clip as
a ringtone.
Navigate to the
desktop — or
wherever you
saved the file —
click the file’s
name, and change
the extension
from “.m4a” to
“.m4r.” Click
the Use .m4r
or Yes button in
the resulting
window to
confirm the
changes.
Note that some
Windows users
may find that
they’re unable
to change the
file extension,
at least by
default. This is
likely because
their system is
set to not show
file extensions.
To change this,
open the
Control Panel
from the
Start menu — you
can also search
for the Control
Panel app in
Windows 10 — and
select Appearance
and
Personalization.
Next, click
File Explorer
Options.
Afterward,
click the View tab,
uncheck the box
beside “Hide
extensions for
known file
types,” and
click the Apply button
at the bottom of
the window. Now
you should be
able to see and
edit the file
extension.
Step 7: Add file
to your iPhone
To add the .m4r
ringtone file to
your iPhone,
connect your
device to your
computer using a
lightning-to-USB
cable. Then,
select the
iPhone icon in
the upper-left
corner. Go to
the Summary
section and
scroll down to
Options.
Check the box
beside “Manually
manage music and
videos” and
click Apply.
Now, drag the
.m4r file into
the Tones tab
located under On
My Device, which
will automatically
sync the
ringtone with
your iPhone.
Note: If
you’re having
issues dragging
the .m4r file to
the Tones tab
after you apply
the changes,
disconnect your
iPhone and
restart iTunes.
Then, connect
your iPhone and
try dragging the
file into the
window again.
Step 8: Set your
ringtone
Go to
Settings > Sounds
& Haptics >
Ringtone. Afterward,
select your
desired ringtone
from the top of
the resulting
list. Keep in
mind you can
always set the
new ringtone as
your text,
voicemail, or
email tone in
addition to your
notification
sound for
Facebook posts
and tweets. A
tone is a tone
when it comes to
Apple, and as
such, you can
use it as the
default sound
for any
notification or
alert. Now,
repeat the
process as
necessary!
_________________________________________________________________
Step 1: Open and
update iTunes
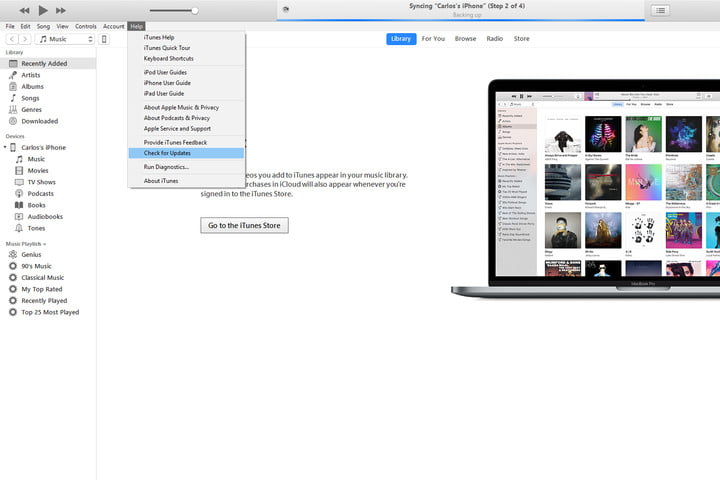
To begin, launch
iTunes in
Windows or MacOS
and ensure
you’re using
the latest
version of
iTunes before
you continue. To
do so using
MacOS —
High Sierra
or otherwise —
click iTunes in
the application
toolbar and
select Check
for Updates from
the resulting
drop-down menu.
If using the
latest version
of Windows 10,
click the Help option
housed in the
menu bar below
the playback
buttons, and
select Check
for Updates near
the bottom of
the resulting
drop-down list.
Step 2: Choose a
song
Next, choose the
song you’d like
to use for your
new iPhone
ringtone. Keep
in mind that
iPhone ringtones
continually run
in 30-second (or
less) loops, so
don’t pick
something that
you are going to
regret
later. Once
you’ve chosen
the appropriate
song, memorize
or jot down the
start and stop
times for
the desired, 30-second
portion of the
song you wish to
use as your
ringtone.
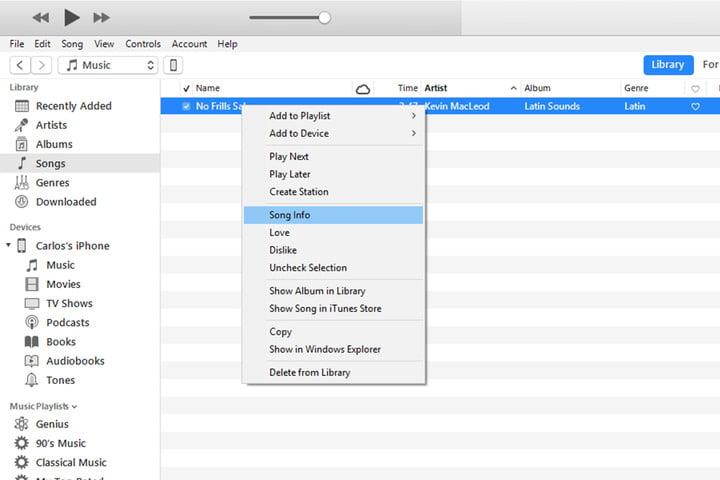
Step 3: Add the
start and stop
times
One of the
lesser-known
features of
iTunes is the
software’s
ability
to “crop” songs
and videos,
which allows you
to
choose specific
times for them
to start and
end. This is how
we will select a
portion of a
song to use as a
ringtone. First,
right-click or
Ctrl-click the
song you want
and select Song
Info from
the resulting
drop-down list.
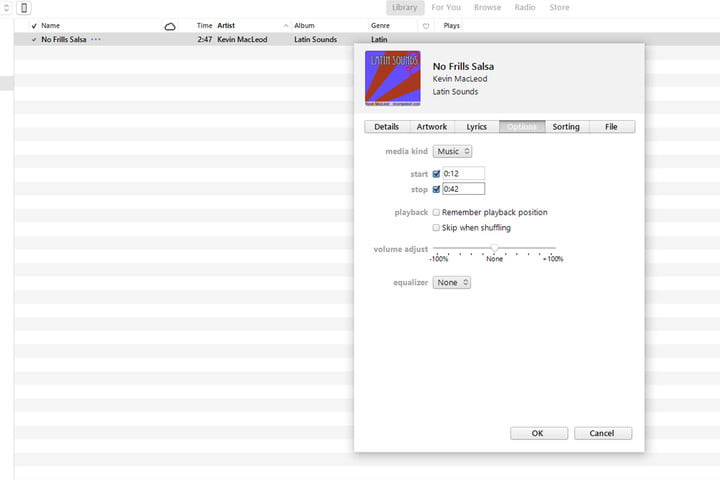
Afterward,
click the Options tab
at the top of
the window.
There should be
fields for Start
and Stop. Enter
the times you
want. Remember
that ringtones
max out at 30
seconds, so keep
it at or below
that length. For
our purposes,
we’ll use a
segment from
0:12 to 0:42 in
the song. Once
done, click
OK at the
bottom.
Step 4: Create
an AAC version
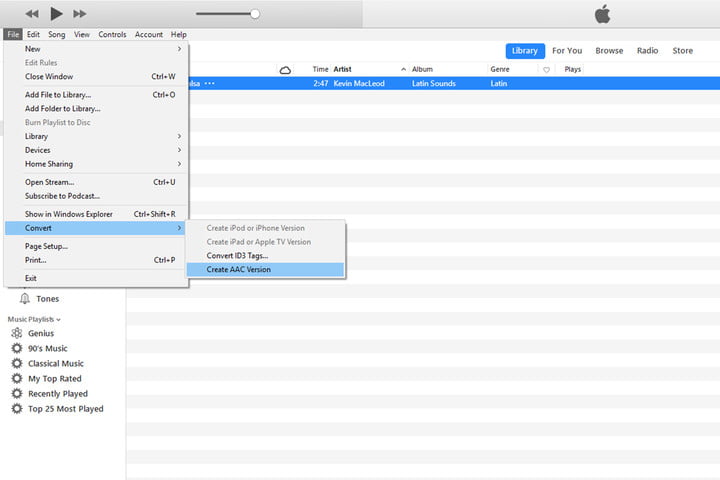
AAC is an audio
format that
Apple prefers to
use for its
devices;
essentially, it
achieves the
same sound
quality as an
MP3 while using
less storage
space. Recent
versions of
iTunes give you
the option to
create an AAC
version of any
song you choose,
which is nice
when you need to
conserve hard
drive space and
create a
ringtone. Once you’ve
set your
appropriate
start and stop
times, with the
short version of
the song
selected, go to
File,
Convert,
and Convert
to AAC Version. Because
we’ve altered
the start and
stop times for
the song,
creating an AAC
version will
create a copy of
that specific
section of the
song. The
copy will then
automatically
appear in your
iTunes library,
directly beneath
the original
song.
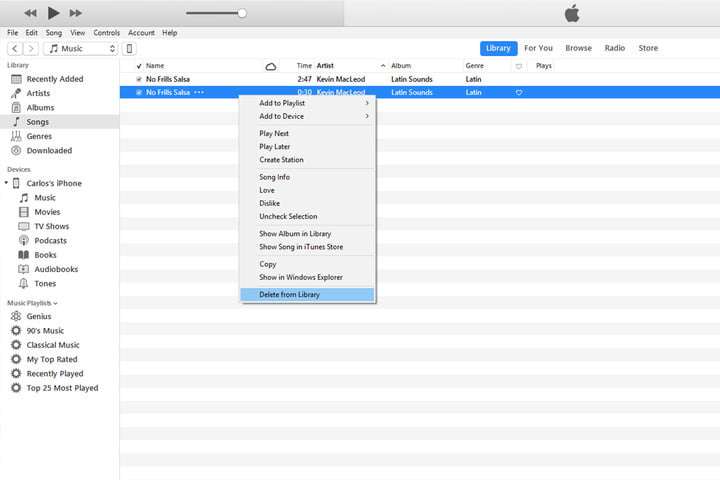
Step 5: Copy the
file and delete
the old one

Once created,
click the AAC
version of your
song and drag it
to the desktop
or your desired
save location.
This will copy
the file to that
location.
At this point,
you probably no
longer need the
shortened song.
Unless you want
to keep the
30-second
snippet for some
reason, you
might as well
delete the file
to clear up
any unnecessary
clutter.
Right-click or
Ctrl-click the
AAC file in
iTunes, and
select Delete
from Library from
the resulting
drop-down menu.
Then, click the
Delete File button,
if prompted.
Changing the
extension
and setting your
ringtone
Step 6: Change
the extension
AAC files
typically use
the file
extension
“.m4a,” which
you might notice
when you click
on your AAC
file. For
ringtones,
however, iTunes
uses the “.m4r”
extension, which
is the same as
.m4a but with a
different name.
That being the
case, we will
need to change
the extension
from .m4a to
.m4r in order to
use this clip as
a ringtone.
Navigate to the
desktop — or
wherever you
saved the file —
click the file’s
name, and change
the extension
from “.m4a” to
“.m4r.” Click
the Use .m4r
or Yes button in
the resulting
window to
confirm the
changes.
Note that some
Windows users
may find that
they’re unable
to change the
file extension,
at least by
default. This is
likely because
their system is
set to not show
file extensions.
To change this,
open the Control
Panel from the
Start menu — you
can also search
for the Control
Panel app in
Windows 10 — and
select Appearance
and
Personalization.
Next, click File
Explorer
Options.
Afterward,
click the View tab,
uncheck the box
beside “Hide
extensions for
known file
types,” and
click
the Apply button
at the bottom of
the window. Now
you should be
able to see and
edit the file
extension.
Step 7: Add file
to your iPhone
Next
Previous
1 of 2 Video
starting in
Close Video
To add the .m4r
ringtone file to
your iPhone,
connect your
device to your
computer using a
lightning-to-USB
cable. Then,
select the
iPhone icon in
the upper-left
corner. Go to
the Summary
section and
scroll down to
Options. Check
the box beside
“Manually manage
music and
videos” and
click Apply.
Now, drag the
.m4r file into
the Tones tab
located under On
My Device, which
will automatically
sync the
ringtone with
your iPhone.
Note: If you’re
having issues
dragging the
.m4r file to the
Tones tab after
you apply the
changes,
disconnect your
iPhone and
restart iTunes.
Then, connect
your iPhone and
try dragging the
file into the
window again.
Step 8: Set your
ringtone
Go to Settings
> Sounds &
Haptics >
Ringtone. Afterward,
select your
desired ringtone
from the top of
the resulting
list. Keep in
mind you can
always set the
new ringtone as
your text,
voicemail, or
email tone in
addition to your
notification
sound for
Facebook posts
and tweets. A
tone is a tone
when it comes to
Apple, and as
such, you can
use it as the
default sound
for any
notification or
alert. Now,
repeat the
process as
necessary!
Update: Tweaked
instructions for
greater clarity.